
Printing a Cover
Printing a cover is a bit more difficult than printing the pages in that everything is dependent on the number of chapters and the thickness of the book. The cover requires a sheet of paper 8-1/2 x 14 in order to accommodate the thickness of the spine. Here again, you are faced with what type of paper to use for the cover.
I used a 65# white drawing paper which came in a 11 x 14 fifty sheet pad as a template for my cover. This had to be cut down to 8-1/2 x 14. After the template was completed, I took it to Kinko's and had them copy and print this template as one large image approximately 8-1/2 x 12 onto 8-1/2 x 14 card stock. The card stock was very easy to bend to conform to the dimensions of the book. I also found that the card stock gave the cover a very smooth finish and also made it very durable.
Now lets take a look at how to set this template up in word.
The first step with word open is to click on File, Page,
Setup and it will open the default page set up for a normal
8-1/2 x 11 page. What we need to do is change those settings to
an 8-1/2 x 14 page. Our goal is to create on our 8-1/2 x 14
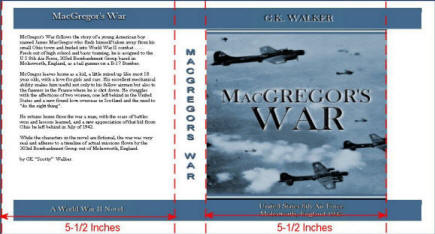
sheet, a page that looks like the one directly below that has
5-1/2 inches allotted to the back portion of the cover and 5-1/2
inches to the front portion of the cover and the thickness of
the compressed pages for the spine portion of the cover.
It is important to note that building this template in Word has
a few draw backs. You can't properly edit the images using word
so you will need an alternate such as Paint Shop Pro or
Photoshop and you also need to design your cover in such a
manner that allows for a 1/2" space at the very top and bottom
of the finished cover as word will not print in those areas.
Because you have a finished sheet that is 14 inches wide, you
can work around this problem at the ends by slicing the white
area off with a paper cutter.
Now, lets have a look at the setup. Under Margins, select Landscape and Normal
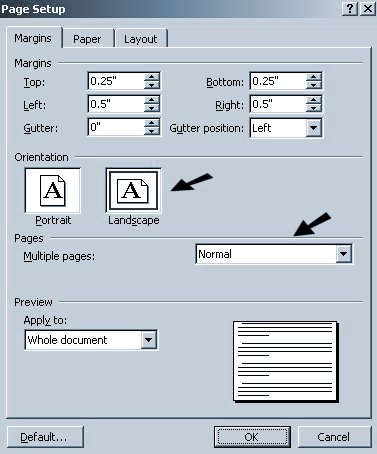
Set the paper width to 14" and the height to 8.5".
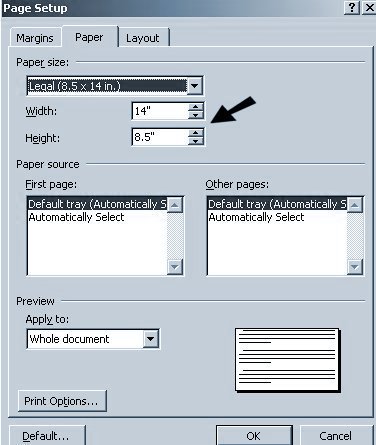
There will be no header or footer used so the layout page can remain unchanged.

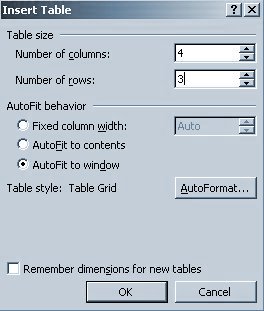
The next step is to insert a table. Click on Table>Insert>Table and then select 4 columns and 3 rows and select AutoFit to window.
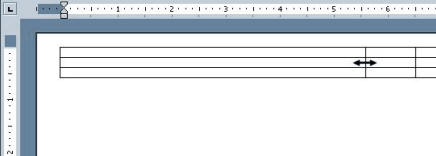
Once you click on ok, it will place the table on the page as you see below. You will want to make the table borders invisible later on but for now, you need to place the cursor on the border where you see the double arrow and slide the left table cell width over to 5-1/2", slide the spine cell to the thickness of your book (mine was 1") and then slide the third cell over another 5-1/2". This will set up the width dimensions for your cover as well as give you the table you will work within to set up your text and images.
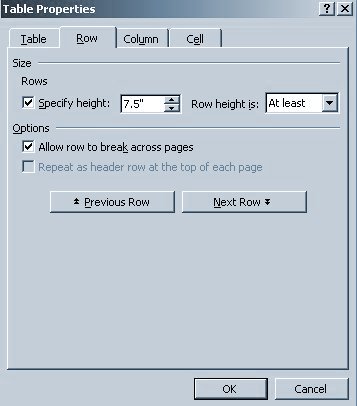
The next step is to right click on the table and select table properties. This will bring up the window you see below. Set the height of the table row to 7.5".
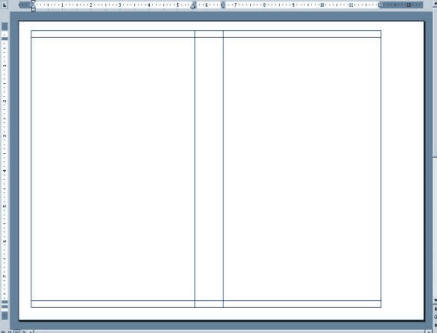
Once you have done that, your table should look something like the one you see below.
The last step in this process is to either type in the text that you want on your cover or you can use text images that you would create in your image editor. I used a combination of images, text images, and typed text for my cover that is displayed above. Once I was satisfied with the results after printing my cover on a sheet of paper 8-1/2 x 14 legal paper, I ran the special 65# sheet of paper mentioned above that was better suited for images through my printer and printed it out. Then I took the finished copy to Kinko's and had them run copies of it on 8-1/2 x 14 card stock
One important thing to remember here is that images can drastically change table dimensions if they are bigger than the cell you are putting them in. After inserting images, always resize them according to your desired dimensions. If your table extends to another page, you need to make changes so that everything within the table is on the one page.
This completes the tutorial on book binding. Next let's have a look at creating an eBook